Songs
This section describes the use of the various converters built into OpenLP for managing and importing song files from other formats.
Song Importer
If you are using an earlier version of OpenLP or, come from another software package, you may be able to convert your existing database to work in OpenLP. OpenLP can import songs from the following sources:
OpenLyrics or OpenLP 2 Exported Song
Generic Documents/Presentations (Requires LibreOffice)
CCLI SongSelect Files
DreamBeam Song Files
EasySlides XML File
EasyWorship 2009 Song Database
EasyWorship 2009 Service File
Foilpresenter Song Files
LiveWorship Database Dump
LyriX (Exported TXT-files)
MediaShout Database (Windows only)
PowerPraise Song Files’
PowerSong 1.0
PresentationManager Song Files
ProPresenter 4 Song Files
SongBeamer Files
SongPro (Export File)
SongShow Plus Song Files
Songs Of Fellowship Song Files (Requires LibreOffice)
SundayPlus Song Files
VideoPsalm Files
Words Of Worship Song Files
Worship Assistant (Export CSV)
WorshipCenter Pro Song Files (Windows only)
ZionWorx (Converted CSV)
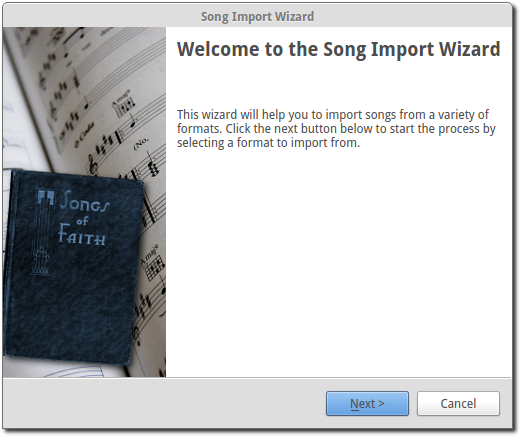
To access the Song Importer click . You will see the Song Importer window, then click Next.
After choosing Next you can select from the various types of software that OpenLP will convert songs from.
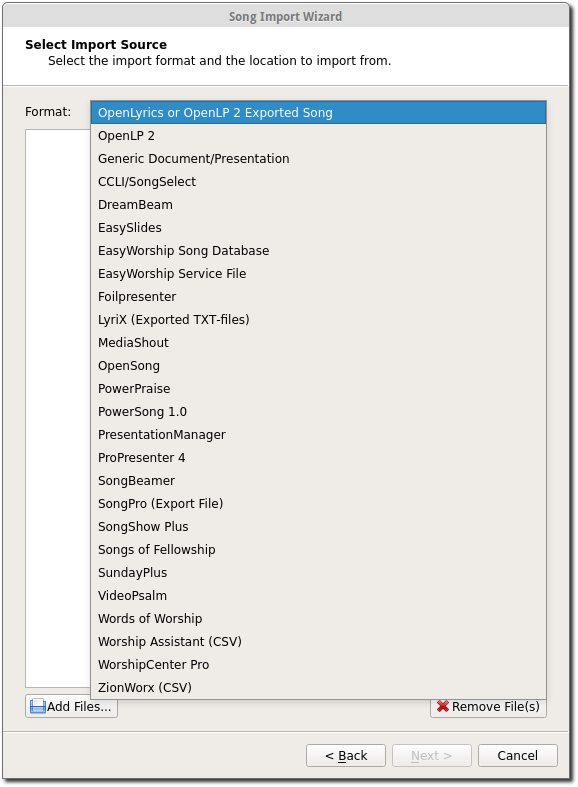
Click on the file folder icon to choose the file of the song database you want to import. See the following sections for information on some of the different formats that OpenLP will import.
Importing from OpenLyrics or OpenLP 2 Exported Song
OpenLyrics is an open format for song lyrics defined at openlyrics.org, and is the format the OpenLP can export songs to, see Exporting Songs.
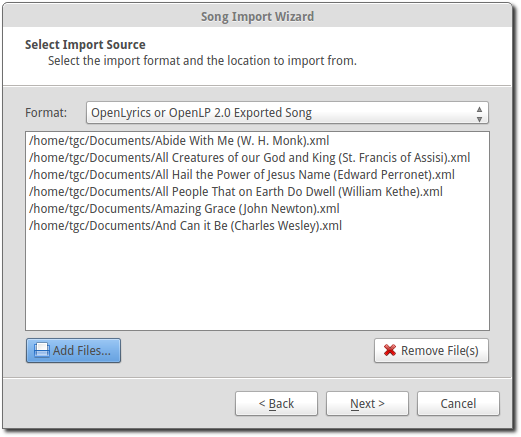
To import press Add Files… and select the OpenLyrics files. Then press Next to import the files.
Importing from EasyWorship Song Database
OpenLP can import the song database from EasyWorship 2007 and 2009. To import
songs from EasyWorship’s database you must find and select the file
Songs.DB. You will normally find the file in
C:\Users\Public\Documents\Softouch\EasyWorship\Default\Databases\Data\.
OpenLP will import all the songs it finds in the database.
Importing from OpenSong
Converting from OpenSong, you will need to locate your songs database. In the later versions of OpenSong you are asked to define the location of this. The songs will be located in a folder named Songs. This folder will contain files with all your songs in them, without a file extension (file.xxx). When you have located this folder you will need to select the songs from the folder.
On most operating systems, to select all the songs, first select the first song in the list, press the shift key, and select the last song in the list. After this press Next and you will see that your import has been successful.
Press Finish and OpenLP will be ready to use your songs that you imported from OpenSong.
Importing from CCLI Song Select
To import from CCLI Song Select you must be a CCLI Subscriber and also a subscriber of the Song Select service. For more information go to the CCLI website.
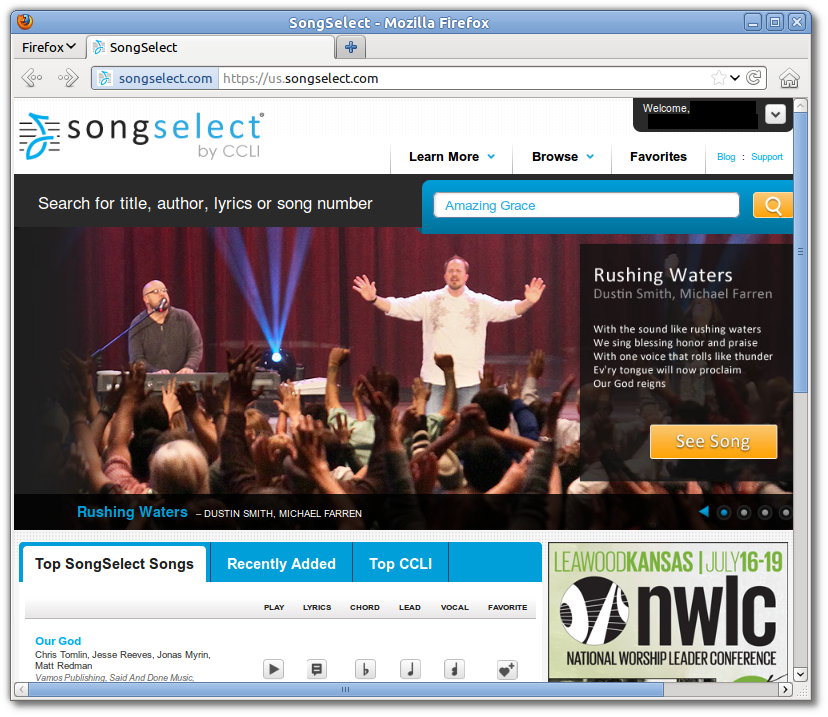
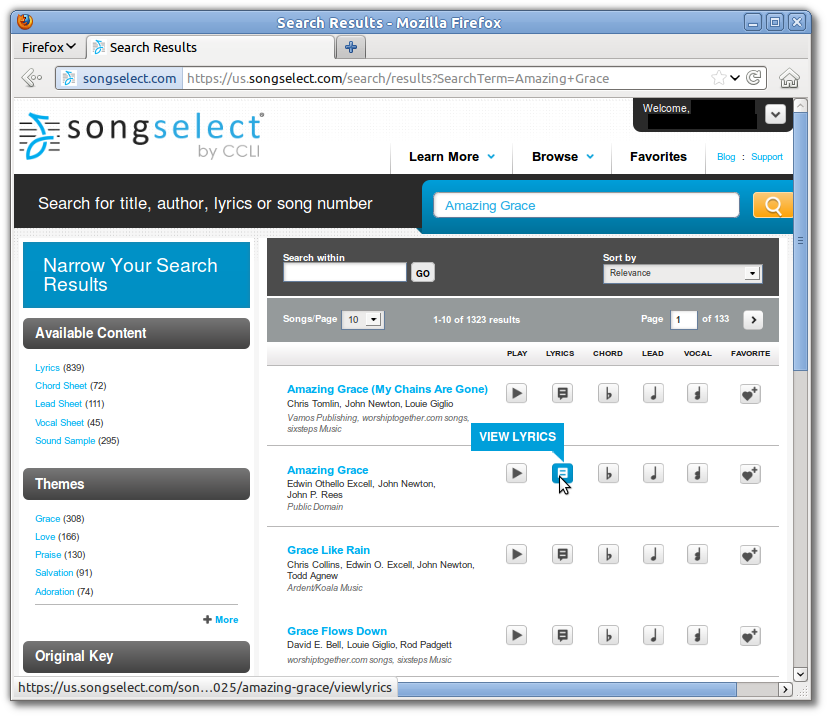
The first step for importing from CCLI Song Select is to log into your account. Once you have logged in search for your desired song. For this example we will be searching for and adding the song “Amazing Grace”.
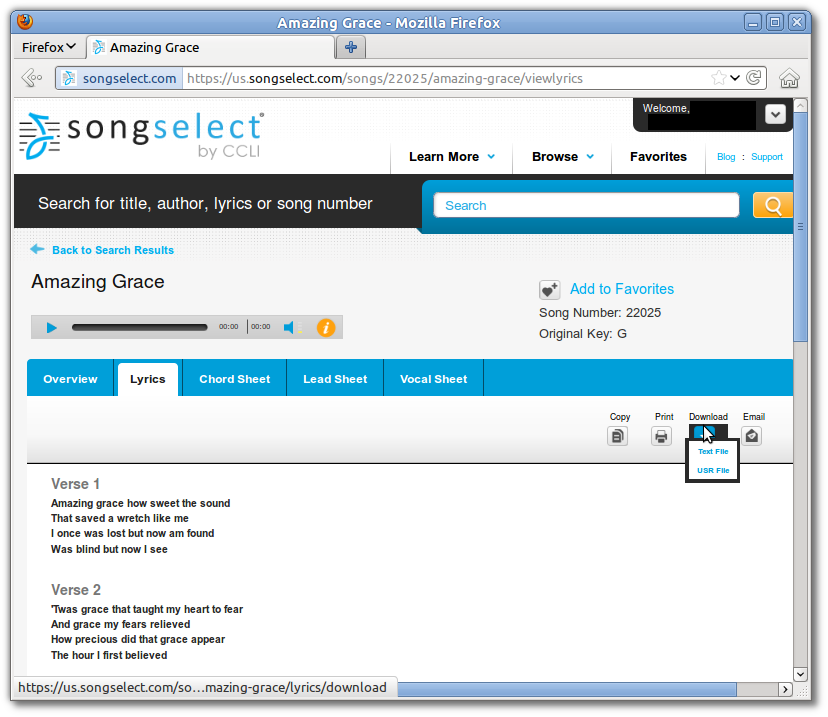
You will be presented with the results of your search. Click the LYRICS button and it will take you to the lyrics page displaying the lyrics and copyright information for your song.
Next, hover the mouse over the Download button from the upper right corner and choose either the .txt or .usr file.
You will be asked to choose a download location if your browser does not automatically select one for you. Select the downloaded file from the OpenLP import window and then click Next. When import is finished, you will find your song in the Library.
Note: Most operating systems allow you to select multiple songs for import by selecting the first item in the list and then holding the Shift and selecting the last item in the list or holding the Ctrl and selecting the files individually.
Press Finish and OpenLP will be ready to use your songs imported from CCLI SongSelect.
Importing from ZionWorx
ZionWorx stores your songs in a proprietary database format which OpenLP is unable to access directly. You will first need to convert it to a CSV text file, which OpenLP and other tools (such as spreadsheet applications) are able to access. This can be achieved via a demo third-party utility called “TurboDB for VCL 6” for database version 3.8 or a free third-party utility called “TurboDB Data Exchange” for database version 2.5/2.6.
First, locate your ZionWorx songs database. ZionWorx lets you define the
location in . The database folder will
contain a collection of files. If you find Song.tbdbt your database
is version 3.8. If you find files such as Data.tdbd and
MainTable.dat your database is version 2.5/2.6.
Default location for ZionWorx 3.8 on Windows 10:
C:\ProgramData\Jubilate Software\ZionWorx\DataDefault location for ZionWorx 2.6 on Windows XP:
C:\Documents and Settings\All Users\ZionWorx\2.6\DataDefault location for ZionWorx 2.6 on Windows Vista or later:
C:\ProgramData\ZionWorx\2.6\Data
Version 3.8
Download TurboDB for VCL 6 from dataWeb. The install will be a windows installer file.
Create a Restore Point before installing TurboDB for VLC 6.
Double Click the TurboDB for VCL 6 file you downloaded and follow the prompts to install the programs. Use all the default options for any questions you may be asked. Once the installation is complete open TurboDB Viewer from the start menu.
Open the database using the dropdown menu.

Use the File Selection window to select any of the files in your database directory. When the File Selection window closes you will see the tables in the database displayed near the top of the TurboDB Viewer window. Select the SQL tab just above the table names.

Cut and Paste the SQL command below into the SQL tab.:
Select SongID,
Title,
AltTitle as "Title2",
Lyrics,
WordsBy+' '+MusicBy as "Writer",
Copyright,
PublicDomain as "Keywords",
DefaultStyle
from Song
With the SQL command entered into the SQL tab, select the green Run arrow to run the SQL statement.

When the SQL command has been processed the lower part of the window will contain the songs from the ZionWorx database in the format that OpenLP can import. To export the songs to a file, select

The TurboDB Batch Move Wizard will open to guide you through the export process. Select the … button and use the file selection window to navigate to a directory and create a name for the output file.

Use the filetype dropdown to select Text File as the file type of the export file.

Once the filename and the filetype have been input press the Continue button.

The Wizard will update and allow you to set the options for the export. Verify that the checkbox for The First row of the file holds the fieldnames is checked. Verify that the Quoted Character is the double quote. Verify that the Fields are separated by option is a comma. Then press the Continue button.

When the progress completes you will see a completion message in the window and can select the Close button to close the Batch Move Wizard.

Please see Importing the CSV file below to import your songs.
Version 2.5/2.6:
Download TurboDB Data Exchange from dataWeb. The utility will be downloaded as an archive file:
Windows:
Open
tdbdataX.zipand copyTdbDataX.exeinto your ZionWorx database folder.Press the keyboard combination Windows key + R to open the Run window.
Type cmd and click OK.
In the command prompt window that opens, type these commands (replacing
database-folderwith your actual location), followed by Enter:cd "database-folder" tdbdatax MainTable.dat songstable.csv -fsdf -s, -qdLinux:
Right click on
tdbdatax.tar.gzand select Unpack or Extract. Then right click ontdbdatax, select Properties, and make sure the executable option is checked.Alternatively, in the terminal:
tar xvzf tdbdatax.tar.gz
chmod u+x tdbdatax
Copy
tdbdataxinto your ZionWorx database folder.Finally, open a terminal and cd to your ZionWorx database folder. Type this command and press Enter:
./tdbdatax MainTable.dat songstable.csv -fsdf -s, -qdYou should see some feedback indicating success, such as:
Batch move has moved 408 records.
Importing the CSV file:
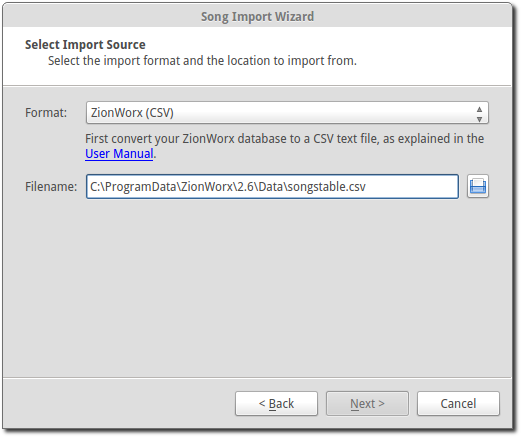
Your ZionWorx songs database has now been converted to a CSV text file. Run the
Song Importer in OpenLP, select ZionWorx (CSV), and locate the
songstable.csv file you just created.
After clicking Next your import will be complete.
Importing from LiveWorship
LiveWorship stores your songs in a proprietary database format which OpenLP is unable to access directly. You will first need to convert it to an XML file file, which OpenLP will then be able to import. This can be done by downloading Valentina Studio from Valentina DB. It is available for both Windows, Linux and macOS. The free version is enough for what is needed to convert the song database. After installing Valentina Studio, open it.
The first time you open Valentina Studio you can enter register and get a serial number (it is available for free) to get full access to Valentina Studio. You can also just cancel or skip this step, which will open Valentina Studio in demo mode, meaning it will only work for 10 minutes at a time, but that is enough for converting a database.
Open and find the song database file
you wish to convert. It will usually end with .vdb, on Windows it will
usually be located in
C:Users<username>AppDataLocalVirtualStoreProgram Files (x86)LiveWorshipMedia Library
This will open the song database. To dump the database content to XML, open
. Select XML as Output Format
and Structure And Records for Dump Content. Select
Dump Destination and keep the encoding as UTF-8 and save
the dump.
Your LiveWorship songs database has now been converted to an XML file. Run the Song Importer in OpenLP, select LiveWorship Database Dump, and locate the XML file you just created.
After clicking Next your import will be complete.
Creating or Editing a Song Slide
When you want to create a new song slide or, once you have a song imported, you want to edit and rearrange the Title & Lyrics, Author, Topics & Song Book, assign a Theme, or edit Copyright Info & Comments, you will do this through the Song Editor.
- Edit:
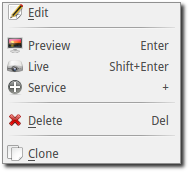
To edit an existing song you can either click on a song in the Library and then click the button to Edit the selected song or right click a song from either the Library or additionally from the Service and click Edit item. If you are adding a new song click Add a new Song in the Library.
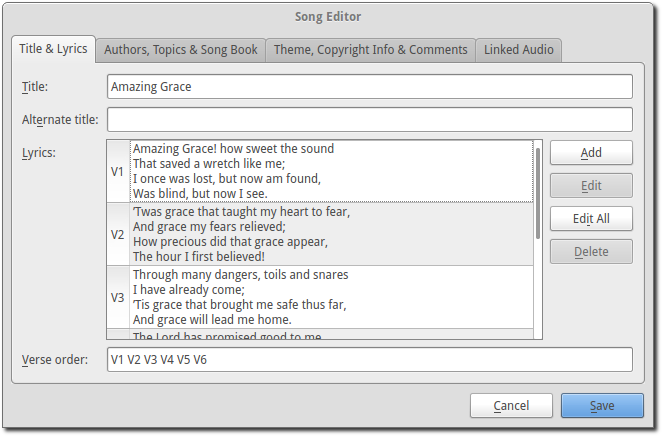
- Title:
This is where you would name the song or edit a song name.
Note: Anything typed in the title name between these brackets <> will not be displayed in the screen title. See Clone below.
- Alternate title:
Alternate Title was for songs with two names “Lord the Light” - “Shine Jesus Shine”. You can also add a name in this box that will bring up the song in Titles search. Example: You could use an alternate title of “hymn” on all your hymn song titles for grouping. When you search “hymn” it will show all the hymns that have “hymn” for the Alternate title.
- Lyrics:
The Lyrics window shows all lyrics imported or added. On the left side of the lyrics you will see a capital letter followed by a number. A V1 would represent verse 1, C1 would be Chorus 1. You will use these letters and numbers for the order to display the lyrics.
- Verse Order:
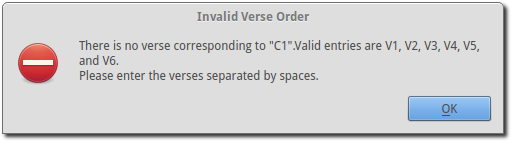
After you entered or edited your song, you will want OpenLP to display the verses in the correct order you want them displayed. On the left side of your lyrics you will see C1, V1, V2 etc. the way they were imported or added. To put your lyrics in the correct order is as simple as typing in the Verse order box at the bottom, the correct order you want them displayed, with only a blank space in between each entry. The correct format will look like this: V1 C1 V2 C1 V3 C1. If you forget to put a space in between the order, or if you do not have the corresponding verse number, OpenLP will politely tell you with a pop-up error message what is wrong so you can correct your mistake and save it. Verse order is optional and if left blank the verses will display in the order seen in Lyrics.
If you forgot to add a verse or intentionally left a verse out of your order you will see the notification at the bottom left of the window saying “Warning: Not all of the verses are in use.”

If you have not entered a verse order, you will see a notification in the same place saying “Warning: You have not entered a verse order.”
- Clone:
OpenLP gives you the ability to clone a song. This could be useful if you use a different version of the song with slightly different lyrics. Instead of typing in all the lyrics again, you can clone it which makes an identical copy of the original song.
To Clone a song right-click on the song you would like to duplicate and left- click Clone.
After you click Clone you will see the copy of the song with <copy> in the title.
Note: Anything typed in the title name between these brackets <> will not be displayed in the screen title.

Adding or Editing the Lyrics
- Add:
To Add a new verse, click on Add. The main window is where you will type your lyrics. OpenLP is packaged with a spell checker for most languages. If you misspell a word it will be underlined. Right click the underlined word and left click Spelling Suggestions or you can ignore it and continue typing. You also have the ability to format the font using Formatting Tags. Highlight the word/words you want to format and right click the highlight. Left click Formatting Tags and choose the format you want to apply to the font and the format tags will be entered with your lyrics. These tags are not visible when displayed. To remove the format, delete the tag on each end of the word or sentence.
- Edit:
To edit an existing verse, click on the verse you wish to Edit then click on Edit, make your changes and click Save.
- Edit All:
To edit the whole song at once, click on Edit All.
- Delete:
To delete a verse, click on the verse you want to delete and it will highlight, click on the Delete button and it will be deleted.
Warning: Once you click the Delete button, you will not be asked again, it will be deleted immediately.
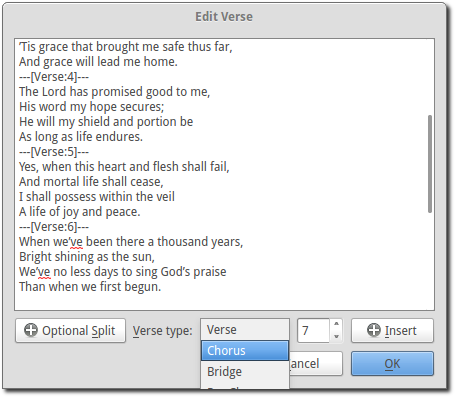
- Verse type:
Select one of seven ways to classify your lyrics. Verse, Chorus, Bridge, Pre-Chorus, Intro, Ending, Other.
- Optional Split:
Inserts an optional split into the verse. An optional split is used by OpenLP to improve splitting verses when presenting on a screen where there is not room for the entire verse on one screen. If an optional split exists, OpenLP will use it when splitting the verse, otherwise it will simply split the verse when reaching the end of the screen.
If you have more than one verse, you would number them Verse 1, 2, 3 as needed. If you find the verse has too many lines for your screen, you can edit and shorten the verse and Add another slide.
Authors, Topics & Song Book
Once your Title & Lyrics are added or edited the way you want them you must add or enter the author or authors of the song. OpenLP requires all songs to have an author entered. You can add a blank space for the author name.

- Authors:
Click the drop down arrow to view all authors or start typing a name in the box and a list will appear. If the authors name has not been added, type the authors name in the box and click Add to Song. The authors name will appear below and will also be added to your database. If you accidentally add the wrong author you can click on the authors name and click Remove.
Manage Authors, Topics, Song Books: Clicking this button will bring up your complete list of authors.
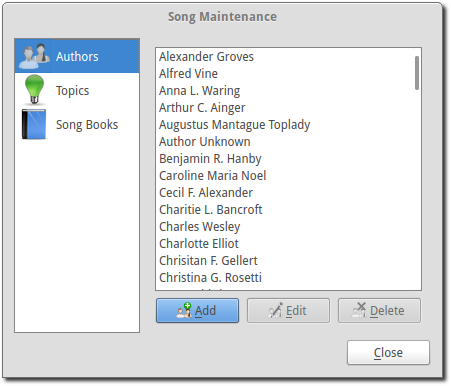
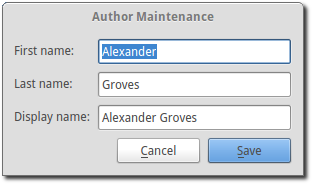
- Add:
Clicking the Add button will bring up a box where you will add the Authors First name, Last name and Display name. Click Save when you are finished.
- Edit:
The Edit button will bring up window where you can edit the info that is already there.
- Delete:
The Delete button will remove the author you have highlighted.
Note: You cannot delete an author that is assigned to a song. Authors names are displayed in the footer.
Theme, Copyright Info & Comments
You can assign a Themes to a song, enter the Copyright information and add the CCLI number to the song. If you imported a song from SongSelect this information will usually be entered.
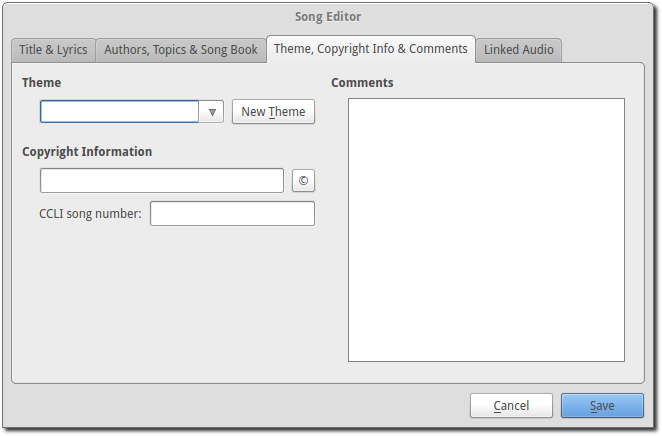
- Theme:
Click the drop down arrow to display your list of themes or start typing a theme name in the box and the list will appear. You can also create a new theme by clicking the New Theme button.
- Copyright information:
Add or edit the copyright information in this box. If you would like to use the © symbol click © button. This information is displayed in the footer.
- CCLI number:
Enter the CCLI number in this box.
Note: This is the CCLI number of the song, not your contract number. This number is not displayed in the footer.
- Comments:
You can add comments in this box. This information is not displayed in the footer.
Linked Audio
OpenLP gives you the ability to play an audio file or multiple audio files when the song is displayed live.
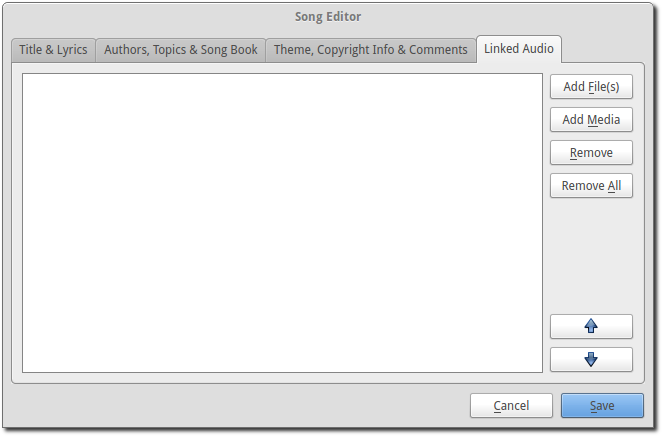
- Add File(s):
Add an audio file from a folder on your computer by clicking Add File(s).
- Add Media:
Add an audio file that is already in the Library by clicking Add Media.
- Remove:
Click on a file you want to remove and click Remove.
- Remove All:
Click on Remove All to remove all audio files linked to the song.
If you added multiple audio files, they will play in the order listed. You can change their position in the order by clicking on an audio file and using the arrows.
 Move selection up one position.
 Move selection down one position.
When you are done, click Save to save your choices. You can click Cancel at anytime if you change your mind.
 This button will appear in the Linked Audio Control when an
audio file is being played with a song. You can stop or start the audio playing
by using this button.
This button will appear in the Linked Audio Control when an
audio file is being played with a song. You can stop or start the audio playing
by using this button.

To the right of the button a count down timer for the audio file is
displayed to indicate the play time remaining for the linked audio file. If you
have multiple linked audio files, the play time remaining will only be for the
current playing linked audio file.
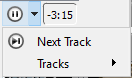
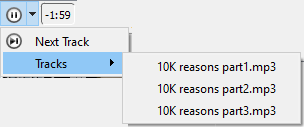
By selecting the drop down menu between the button and the count down
timer you can jump to the next linked audio file for the song using Next Track or select
the Tracks menu selection and jump to any linked audio file in the song.
Linked audio files or groups of linked audio files can repeat when the last file finishes playing. To set linked audio files to repeat, enable the Repeat track list in Configuring OpenLP on the General page.
Linked audio files can be set to start playing as soon as the first slide of the song is displayed. To enable the linked audio files to start playing when the first slide is displayed, disable the Start background audio paused option in Configuring OpenLP on the General page.