Configuring OpenLP
OpenLP has many options you can configure to suit your needs. Most options are self-explanatory and we will quickly review them.
To configure OpenLP, click on
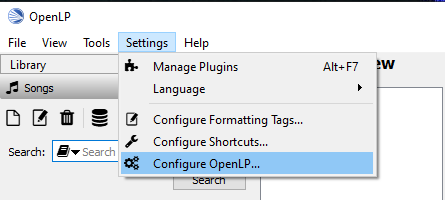
The plugins you have activated will have configure options. If all the plugins are activated there will be 14 items down the left side you can configure.
General
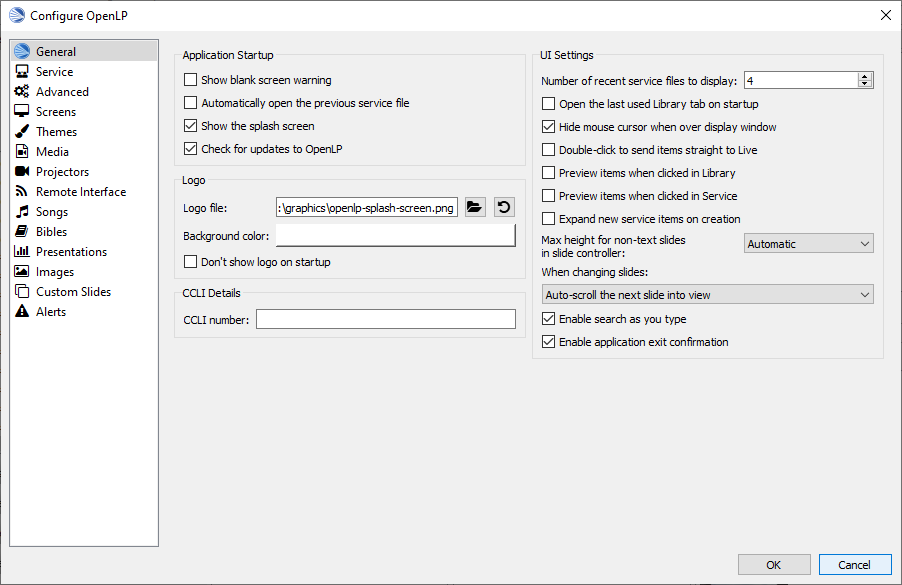
Application Startup
- Show blank screen warning
When this box is selected, you will get a warning when opening OpenLP that the output display has been blanked. You may have blanked it and shut down the program and this will warn you it is still blanked.
- Automatically open the previous service
When this box is selected, OpenLP will remember the last service you were working on when you closed the program.
- Show the splash screen
The OpenLP logo is displayed while OpenLP loads when this checkbox is checked. This is useful to give some indication that the program is loading.
- Check for updates to OpenLP
OpenLP will check to see if there is a newer version available on a regular basis when this checkbox is checked. Please note that this requires Internet access.
Logo
- Logo file:
Select an image file to be displayed when OpenLP is started. Using an image file will override a background color.
 Browse for an image file to display
 Revert to the default OpenLP logo
- Background color:
You can choose the background color that will be displayed when you start OpenLP.
- Don’t show logo on startup
With this box is checked the OpenLP log will not be displayed on startup.
CCLI Details
- CCLI number:
If you subscribe to CCLI, this box is for your License number. This number is also displayed in the Song Footer box.
UI Settings (user interface)
- Number of recent files to display
Set this number for OpenLP to remember your last files open. These will show under .
- Open the last used Library tab on startup
With this box selected OpenLP Library will open on the same tab that it was closed on.
- Hide mouse cursor when over display window
With this box selected your mouse cursor will not be visible if you move it from Display 1 onto Display 2.
- Double-click to send items straight to live
With this box selected, double-clicking on anything in the Library will immediately send it live instead of to Preview.
- Preview items when clicked in Library
With this box selected, clicking any item in the Library will immediately display it in the Preview pane.
- Preview items when clicked in Service
With this box selected, clicking any item in the Service will immediately display it in the Preview pane.
- Expand new service items on creation
With this box selected, everything you add to the Service will be expanded so you can see all the verses, lyrics and presentations, line by line. When you open OpenLP, everything will automatically be expanded in the Service.
- Max height for non-text slides in slide controller
With this box selected, on closing OpenLP you will be presented with a dialog box to confirm closing the program.
- When changing slides
This dropdown controls how the Live and Preview controllers scroll the verses displayed as you progress through the item slides.
- Include slide number in footer
With this box selected, current slide number and total slides number will be visible in the footer.
- Enable search as you type
With this box selected, as you type into text boxes suggestions will be shown.
- Enable application exit confirmation
With this box selected, you will be asked if you really want to close OpenLP.
- Alert if New clicked on blank service
With this box selected, the warning will be displayed when File - New Service is being clicked while the existing service is blank.
- Interface Theme (needs restart)
This dropdown allows to change the UI colour scheme.
Service
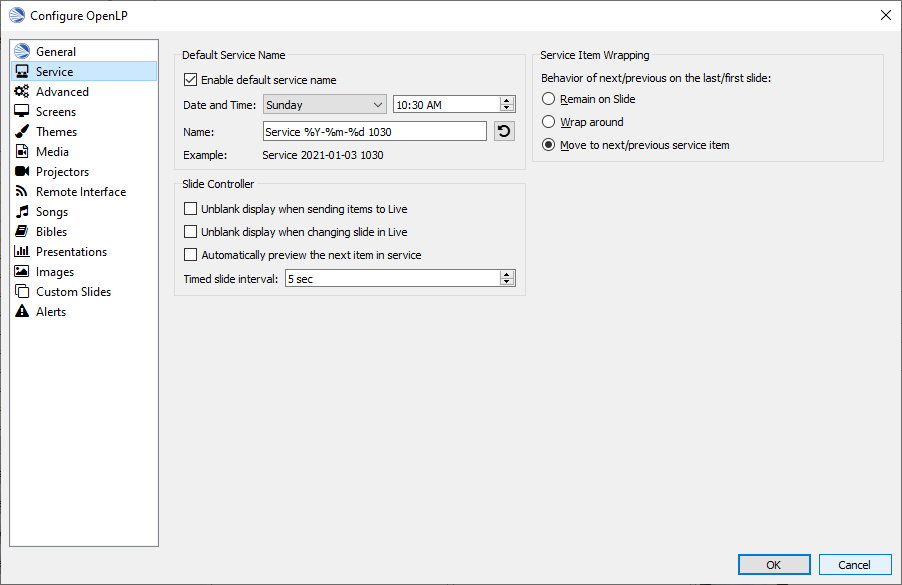
Default service name
The default service name gives you the ability to have a preset name, date and time when saving your service file.
- Enable default service name:
Checking this box will activate the use of the default service name.
- Date and Time:
You can choose the regular day of the week and time of the service or choose Now from the dropdown for the immediate date and time to save your service file.
- Name:
You can change “Service” to a default name of your choosing. The year, month day, hour and minute will default to what you have set for Date and Time above or if you chose Now the saved file will have the time and date that you save it.
- Revert:
Clicking this button will erase your changes and revert to the default service name.
- Example:
The example shows how the name, date and time will be displayed for the file name when saving the file.
Note: If the date and time format does not suit your needs and you are technically inclined, there is more information at Python.org.
Slide Controller
- Unblank display when sending items to Live
When using the blank to button with this checkbox checked, on going live with the next item, the screen will be automatically re-enabled. If this checkbox is not checked you will need to click the blank to button again to reverse the action.
Unblank display when changing slide in live
- Automatically preview next item in service
When this box is selected, the next item in the Service will be displayed in the Preview pane.
- Timed slide interval:
This setting is the time delay in seconds. This is used to continuously loop a group of images, verses, or the lyrics in a song. This control timer is also accessible on the Using the Service Timer
Service Item Wrapping
- Remain on Slide
Up and down arrow keys stop at the top and bottom slides of each Service item. You will need to use the Right Arrow key or the mouse to move to the next Service Item.
- Wrap Around
Up and down arrow keys wrap around at the top and bottom slides of each Service item, eg: When you reach the last slide of a song or verse and Down Arrow you will be back on the first slide. Likewise if you are on the first slide and Up Arrow you will wrap-around to the last slide of the song, images or Bible verses.
- Next Slide
Up and down arrow keys advance to the next or previous Service Item from the top and bottom slides of each Service Item. As long as you have your songs and verses in order, you can use the Down Arrow to move through your service from start to finish. Using this setting makes it possible to use a presentation remote controller.
Service Editing
Show confirmation box when deleting item from service
Advanced
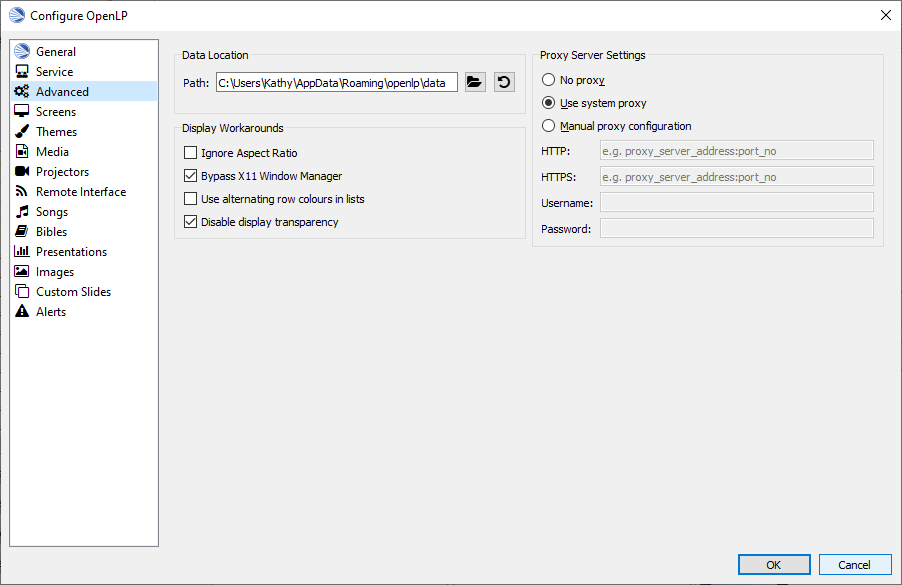
Data Location
If you wish to change the default location of where OpenLP stores its data, you can enter a custom location here.
- Browse for a custom data location
Clicking this button will open the open file dialog and allow you to select ability new location for the Data directory.
- Revert:
Clicking this button will erase your changes and revert to the default data location.
Display Workarounds
- Ignore Aspect Ratio
Selecting this option will allow service items to be displayed as it was originally formated without regard for how the screen is formated.
- Bypass X11 Window Manager
Linux and other X users may need to try toggling this flag if the main display window is causing them problems. For example with this unset, KDE users may find the main display window disappears if they switch windows. Ubuntu users using the Unity interface may find the main screen is corrupted if set. GNOME Shell users may find the window doesn’t fill the whole screen if unset. As it appears to affect different versions and distributions differently, this setting has been added, rather than try and work it out programmatically.
- Use alternating row colors in lists
Using alternating row colors in most cases makes it easier for the human eye to overview a list of items. Uncheck to disable.
- Disable display transparency
Selecting this option prevents the Live display from being transparent.
Proxy Server Settings
You can select a proxy server if needed. Your network administrator will know if this is necessary. In most cases this will not be needed.
- No proxy
Select this option if you do not want to use a Proxy Server.
- Use system proxy
Select this option if you want to use your computers default Proxy Server.
- Manual proxy configuration
Select this option if you want to setup the Proxy Server manually. The remaining options are only active if you select the Manual proxy configuration.
- HTTP:
Enter the IP address for your proxy server followed by the port to be used on your proxy server. Please use the 120.002.168.064:4000 format.
- HTTPS:
Enter the IP address for your proxy server followed by the port to be used on your proxy server. Please use the 120.002.168.064:4000 format.
- Username:
Please enter your username if a username is required by you proxy server. Leave this blank if your proxy server does not require user authenication.
- Password:
Please enter your password if a username and password is required by you proxy server. Leave this blank if your proxy server does not require user authenication.
Screens
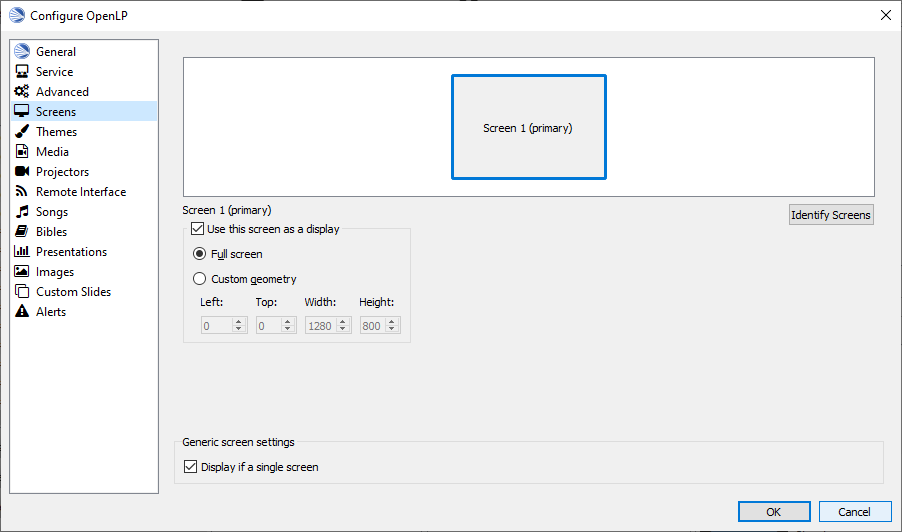
To choose which monitor you want OpenLP’s Live display on, select the appropriate monitor. If only one screen is displayed your system has determined you only have one display it can output to. If you are unsure about what display to use for you Live display select the Identify Screens button.
Use this screen as display
This box needs to be checked for one display.
- Full Screen
Select this option if you want to use the full screen area.
- Custom geometry
This setting overrides the exact position on your screen where the display output appears. If you have a custom projector setup, click the Override display position checkbox, and manually set the position of the display output using the X, Y, Width and Height values.
This setting often comes in useful when you only have a single display, and you want to be able to make the display smaller so that it does not cover your entire screen.
Generic Screen Settings
- Display if a Single Screen
Checking this checkbox will show the display output in a separate window when you only have a single monitor. To close the display window, click on it and press the Esc key.
Themes
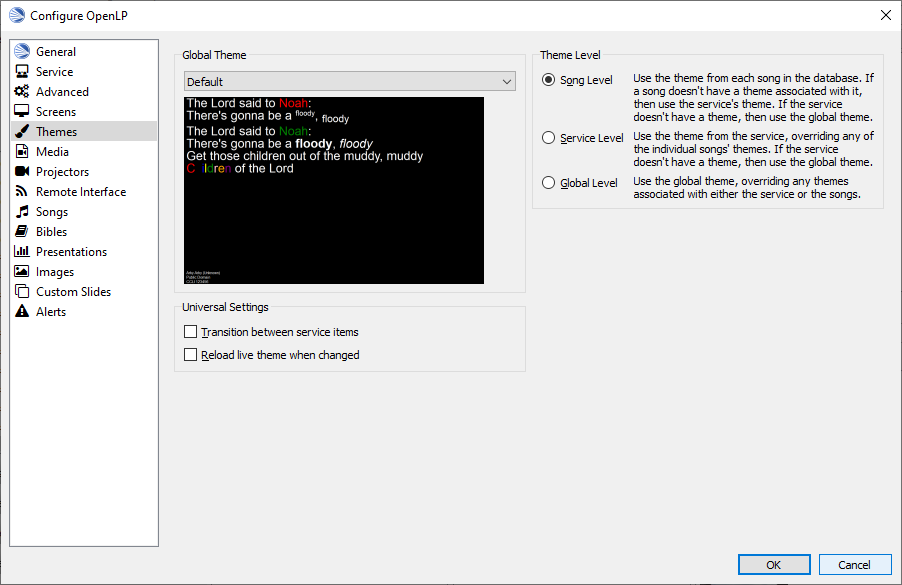
Global Theme
Choose the theme you would like to use as your default global theme from the drop down box. The theme selected appears below unless the theme is a movie theme. The global theme use is determined by the Theme Level you have selected.
Theme Level
Choose from one of three options for the default use of your theme.
- Song Level
With this level selected, your theme is associated with the song. The theme is controlled by adding or editing a song in the Song editor and your song theme takes priority. If your song does not have a theme associated with it, OpenLP will use the theme set in the Service.
- Service Level
With this level selected, your theme is controlled at the top of the Service. Select your default service theme there. This setting will override your Song theme.
- Global Level
With this level selected, all songs and verses will use the theme selected on the left in the Global Theme drop down.
Universal Settings
- Transition between service items
Checking this option will force the theme to use it’s transition between items in the service (so when you change from a song to a Bible verse you’ll get a transition)
- Reload live theme when changed
Check this option if you want the theme reloaded when you edit it while it is currently being used in the current live item.
Media
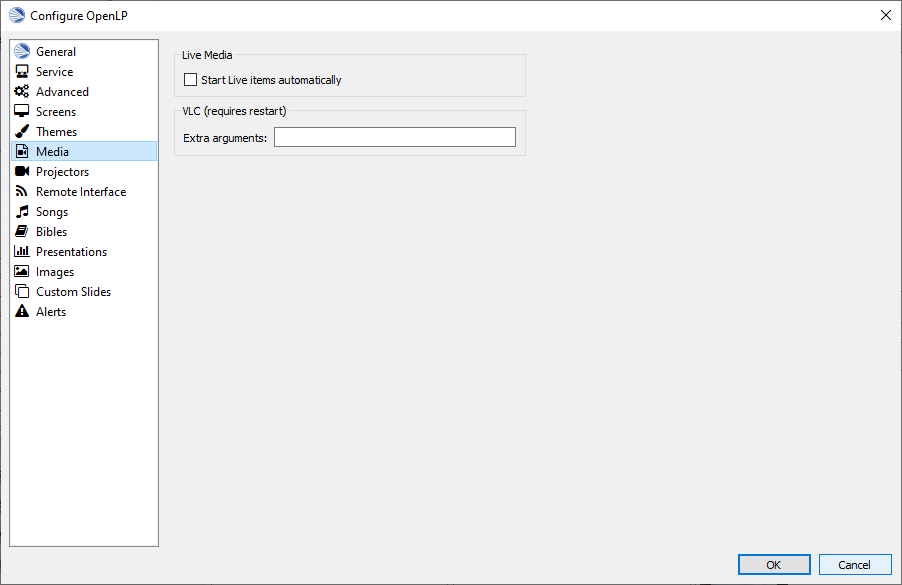
Live Media
- Start Live items automatically
With this option selected songs and videos will start to play automatically when sent live.
VLC (requires restart)
- Extra arguments:
If needed you can add command line arguments to be used with VLC.
Projectors
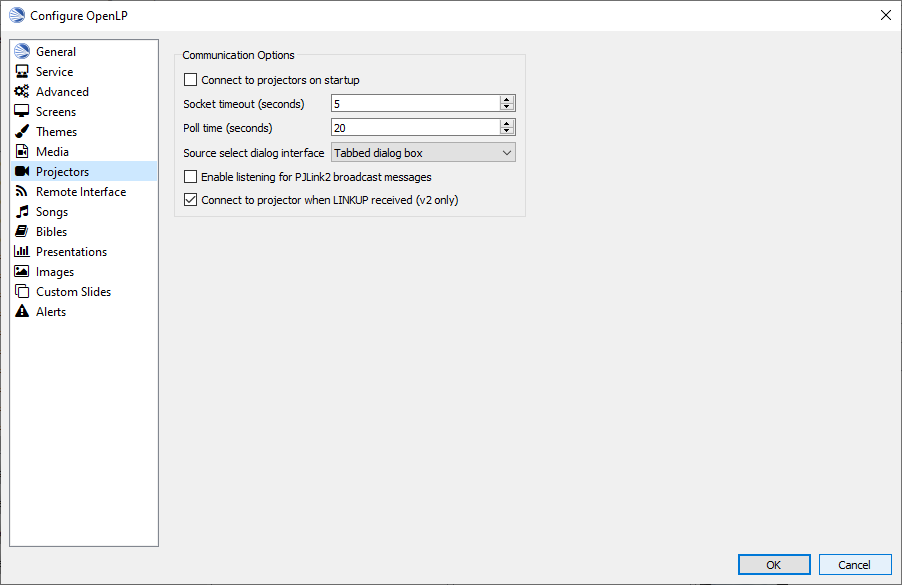
Communication Options
The following options available are:
- Connect to projectors on startup
Check if you want to attempt to connect to all projectors when OpenLP starts.
- Socket timeout (seconds):
Time in seconds to wait for the projector connection. Available options are 2 to 10 seconds.
- Poll timeout (seconds):
How often to poll the projector for status information. Available options are 2 to 60 seconds. For quicker response on the status icons, set to a lower value. If you have network congestion, you may need to use a higher value.
- Source select dialog interface:
Select whether you want all video source options on one dialog page or to use tabs to consolidate the inputs based on video group.
- Enable listening for PJLink2 broadcast messages
Select this option to Enable listening on UDP ports for PJLink2 broadcasts.
- Convert to projector when LINKUP received
Select this option so a projector can be enabled when the LINKUP signal is received from the projector.
Remote Interface
OpenLP gives you the ability to control the Service or send an Alert from a remote computer through a web browser. This could be useful for a nursery or daycare to display an Alert message or, use it as an interface to control the whole service remotely by a visiting missionary or worship team leader.
Stage view gives you the opportunity to set up a remote computer, netbook, tablet or smartphone to view the service being displayed in an easy to read font with a black background. Stage view is a text only viewer.
The remote feature will work in any web browser that has network access whether it is another computer, a netbook or a smartphone. You can find more information about this feature here: The Web Remote.
Note: To use either of these features, your computers will need to be on the same network, wired or wireless.
Server Settings - Non Secure
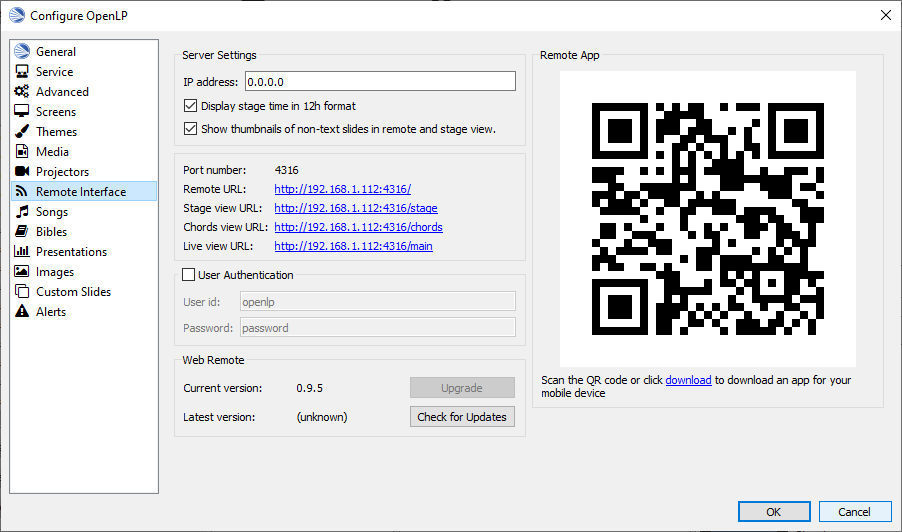
- Listen IP address:
Put your OpenLP computer’s IP address here or use 0.0.0.0 which will allow to listen on all network interfaces.
- Display stage time in 12h format
This setting displays the time in stage view in 12h or 24h format.
- Show Thumbnails of non-text slides in remote and stage view
Check this option if you want to see thumbnails of non-text slides on the Stage and Remote Views.
- Port Number:
You can use the default port number or change it to another number. If you do not understand this setting you should leave it as is.
- Remote URL
Using the remote URL, you have the ability to control the live service from another computer, netbook, tablet or smartphone using a web browser.
- Stage view URL
Using stage view gives you the ability, using a remote computer, netbook or smartphone, to view the live service display in a basic black and white format. This URL shows the address you will use in the remote browser for stage view.
- Chords view URL
Using the chord view adds chords to the Stage view lyrics. This can be helpful when the stage view is used for the musicians that play the cords.
- Live view URL
Using the live view, you can display the Live output on multiple devices.
User Authentication
This option allows the additional security for update functions via the remote interface. Once the userid and password have been accepted then updates will be possible for duration of the web session. This option can be changed without the need to restart OpenLP.
Web Remote
- Installed version
The current version of the remote interface is displayed here. If the current version is different from the latest version, press the Upgrade button.
- Latest Version
The latest version of the remote interface is displayed here after you press the Check for Updates button.
Remote App
You can quickly navigate your phone or tablet to the Remote Interface using QR code reader.
Finding your IP address
If the Remote or Stage view URL are not showing you can manually find these settings. To find your projection computer’s IP address use these steps below.
Windows:
Open Command Prompt and type:
C:\Documents and Settings\user>ipconfig
Press the Enter key and the output of your command will display the adapter IP address. The IP address have a format of x.x.x.x where x is in range 0-255.
Linux:
Open Terminal and type:
linux@user:~$ifconfig
Press the Enter key. This will display a fair amount of technical information about your network cards. On most computers, the network card is named “eth0”. The IP address for your network card is just after “inet addr:” in the section with your network card’s name. The IP address have a format of x.x.x.x where x is in range 0-255.
OS X
From the Apple menu, select . Select active network connection (e.g. Wi-Fi, Ethernet, AirPort, modem). If you are connected, you’ll see its IP address under the “Network Settings…” menu.
With these IP address written down, open a web browser in the remote computer and enter the IP address followed by a colon and then the port number, e.g. 192.168.1.104:4316 then press Enter. You should now have access to the OpenLP Remote view. If it does not come up, you either entered the wrong IP address, port number or one or both computers are not connected to the same network.
Songs
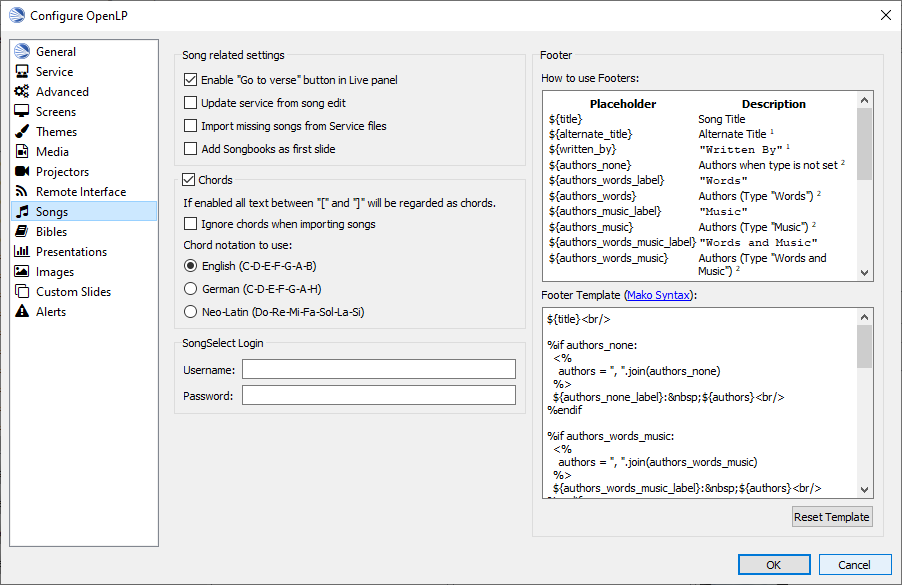
Chords
Enabling this option allows songs with chords to show the chords on the Stage views. Any text in the song that is between “[” and “]” will be regarded as chords.
- Ignore chords when importing songs
This option will allow the song importer to ignore cords in the imported song.
- Warn about missing song key
This option will display warning when no song key is defined before the first chord used in the song. E.g. [=G][G] …
- Chord notation to use
Select the English, German or Neo-Latin notation to match your location or need.
SongSelect Login
You must have a valid SongSelect account to use this option. Type in your username and password to enable automatic login when importing SongSelect songs.
Bibles
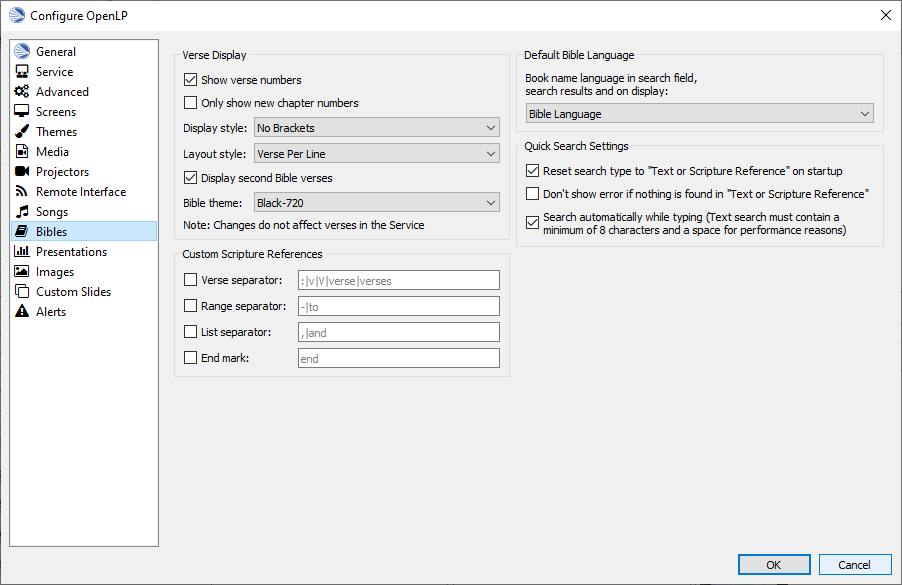
Verse Display
- Show verse numbers
With this box selected verse numbers are always shown, deselect to hide verse numbers.
- Only show new chapter numbers
With this box selected, the live display of the verse will only show the chapter number and verse for the first verse, and just the verse numbers after that. If the chapter changes, the new chapter number will be displayed with the verse number for the first line, and only the verse number displayed thereafter.
- Display style
This option will put brackets around the chapter and verse numbers. You may select No Brackets or your bracket style from the drop down menu.
- Layout style
There are three options to determine how your Bible verses are displayed.
Verse Per Slide: Will display one verse per slide.
Verse Per Line: Will start each verse on a new line until the slide is full.
Continuous: Will run all verses together, separated by verse number and chapter (if chapter is selected to show above).
Continuous (whole verses): Will run all verses together, separated by verse number and chapter (if chapter is selected to show above). This will only add the next verse if it wholly fits on the slide. If it does not fit, it will begin a new slide.
Note: Changes do not affect verses already in the service.
- Display second Bible verses
OpenLP has the ability to display the same verse in two different Bible versions for comparison. With this option selected, there will be a Second choice in the Bible Media Manager to use this option. Verses will display with one verse per slide with the second Bible verse below.
- Bible theme
You may select your default Bible theme from this drop down box. This selected theme will only be used if your Theme Level is set at Song Level.
Note: Changes do not affect verses already in the service.
Custom Scripture References
Here you can change the default separators used in the scripture references. The default values are shown in gray when the custom separators has not be enabled and nothing has been entered. Note that the default separators can change if the language of OpenLP is changed.
Verse Separators: Enable to enter a custom verse separator.
Range Separators: Enable to enter a custom range separator.
List Separators: Enable to enter a custom list separator.
End Mark: Enable to enter a custom end marker.
Default Bible Language
Choose the language of the bible books. The options are:
- Bible Language
The language of the books will be determined by the language of the bible.
- Application Language
The language of the books will be determined by the language set for OpenLP.
- English
The language of the books will be set to English.
Quick Search Settings
- Reset search type to `Text or Scripture Reference` on Startup
Select this option if you want the bible search type to be Text or scripture Reference when OpenLP is started.
- Don’t show error if nothing is found in `Text or Scripture Reference`
Select this option to remove the error message when there are no results for your text or scripture reference search.
- Seach automatically while typing
Select this option if you want a display of possible results to appear as you type in your search criteria. The list will appear after 8 charactors are entered or a space is entered.
Presentations

Available Controllers
OpenLP has the ability to import OpenOffice Impress or Microsoft PowerPoint presentations, and use Impress, PowerPoint, or PowerPoint Viewer to display and control them from within OpenLP. Please remember that in order to use this feature you will need to have one of the above-mentioned applications installed, due to the fact that OpenLP uses these application to open and run the presentation.
Support of PDF is bundled with OpenLP on macOS and Windows. On Linux you will
need to install mupdf (recommended) or ghostscript.
Advanced
- Allow presentation application to be overridden
With this option selected, you will see Present using area with a dropdown box on the Presentations toolbar in the Library Presentations which gives you the option to select the presentation program you want to use.
PowerPoint options
These options are only available if PowerPoint has been detected.
- Clicking on a selected slide in the slidecontroller advances to next effect
When this is enabled it is possible to go to the next effect of a slide by clicking the slide in the slidecontroller. The default behavior is to restart the slide.
- Let PowerPoint control the size and position of the presentation window (workaround for Windows 8 scaling issue)
Windows 8 and 10 can on computers with multiple monitors use scaling to make windows look the same size on different monitors. Unfortunately this can cause issues with how OpenLP places and resizes the PowerPoint presentation window. Check this box to enable the workaround which let PowerPoint control the presentation window. When you enable this you must setup PowerPoint to present to the correct monitor.
Impress options
Use Impress Slide Show Settings / Presentation Display Setting
Images
Provides border where an image is not the correct dimensions for the screen when it is resized.

Image Background
- Use Blank Theme
Select this option to place the image on a blank background. If the image is smaller than the screen, the area around the imabe will be black.
- Custom Theme
Select this option and use the dropdown box to use one of the current themes as a background for the imate.
Custom Slides
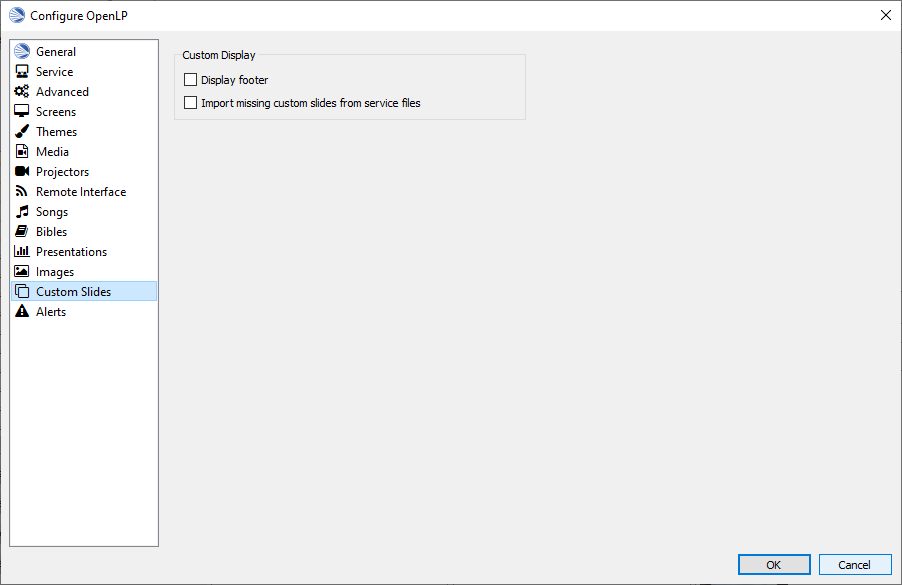
Custom Display
- Display Footer
With this option selected, your Custom slide Title will be displayed in the footer.
Note: If you have an entry in the Credits box of your custom slide, title and credits will always be displayed.
- Import missing custom slides from service files
With this box selected, when you open a service file created on another computer, or if one of the custom slides are no longer in your Library, it will automatically enter the custom slide in your Custom Slide Media Manager. If this box is not checked, the custom slide is available in the service but will not be added to the Library.
Alerts
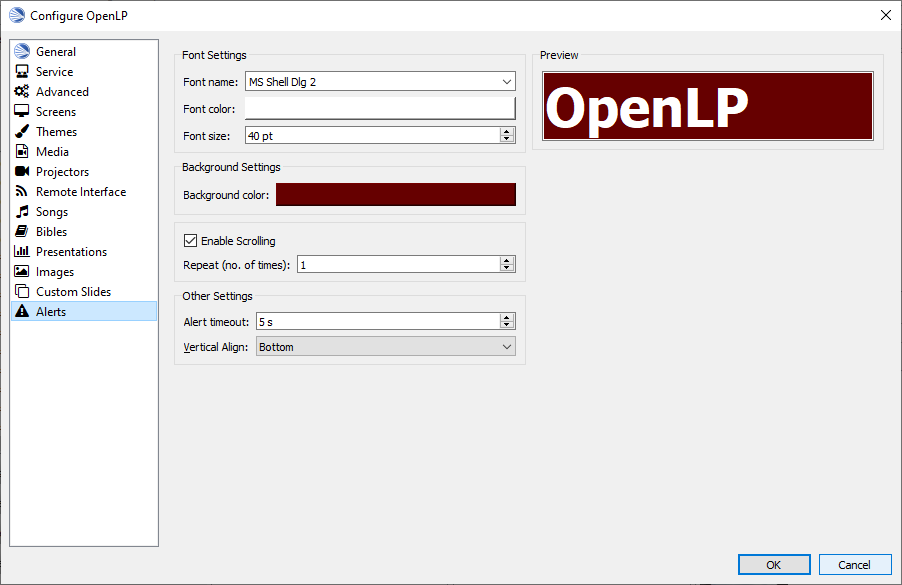
Font Settings
- Font name:
Choose your desired font from the drop down menu
- Font color:
Choose your font color here.
- Background color:
Choose the background color the font will be displayed on.
- Font size:
This will adjust the size of the font.
Background Settings
- Background Color
Select the color box and you can select the background color for the alert.
Enable Scrolling
Select this option and the alert text will scroll across the screen.
- Repeat(no. of times)
If Enable Scrolling has been selected this sets the number of times the alert will scroll across the screen.
Other Settings
- Alert timeout:
This setting will determine how long your Alert will be displayed on the screen, in seconds.
- Vertical Align
Choose the location where you want the alert displayed on the screen, Top, Middle or Bottom.
Preview
Your choices will be displayed here.